MrMikes
Fiero Common Questions

Back

 1. What is meant by "Leather Seating Surface"?

 2. Can I order Matching Leather & Vinyl?

 3. What is included in a MrMikes Leather seats kit?

 4. Can I install MrMikes kit on Power-Lumbar seats?

 5. Access or Replace or Add Headrest Speakers.


 6. How do I fix that broken plastic side cover?

 7. The seat is rusted in place.

 8. The Headliner is falling down.

 9. The Sun Visors fall down.


10. The Console edges are curling up.

 11. Can I change the color of the interior?

 12. Can I put Fiero seats in a different car?

     (MG, Pantera, Manx, DeLorean, Briklin, etc.)

 13. Can I put different seats in a Fiero?

 14. Can the steering wheel leather be changed?

 15. How do I put in new carpet?

 16. The seat foam is deteriorating.


 17. Can I install Seat Heaters?

1. What is meant by "Leather Seating Surface" ?Mr. Mikes Leather Seating Surface

The seat surface where you sit is leather, as represented here by the shaded areas. The white areas are matching leather-ette. The use of matching leather-ette lowers the cost of the seat, retaining the comfort and durability of leather in the areas where it is needed most. And please note that the headrests are always leather too, even though one normally does not sit up there ;)


(top of page)

2. Can I order Matching Leather and Vinyl ?
   Yes

Matching Leather, leather-ette, and cloth is available to complete your interior.

   1.  Leather-ette and Cloth is 54 inches wide and sold by the running yard, meaning they are connected. 1 yard is 54” X 36”, 2 yards is 54” X 72”, 3 yards is 54” X 108”, etc. Each yard contains 13 and ½ square feet. The price of vinyl or cloth is $21 per running yard, or about $1.50 per square foot ($28 per yard for German imported leather-ette). These are synthetic manufactured products so the quality is consistent and free of flaws.

 Because leather-ette is less expensive I recommend using it on large parts like dashboards and door panels.
 
Leather is best used for “contact points”; places the occupants are in contact with the interior; like the seats, armrests, console lids, etc.
 

   2. Leather is sold by the square foot. Leather is not a nice rectangle; it is shaped like a cow. Being a natural product leather hides contain flaws like brand marks, bee stings, and bullet holes. You send MrMike paper patterns of what you need and he will cut these pieces for you from a seat matching leather hide. Leather is priced  at $10 sq. ft. for cut pieces. Measurements are converted from square inches to square feet, such as: a 9 X 17 inch cut piece is 153 square inches or 1.06 square feet or $10.60. These cut pieces are free of flaws.


(top of page)

3. What is included in a MrMikes leather seats kit ?

All seat kits include:
1. Video instructions that shows you how to install a MrMikes Leather Seats Kit.
Step by step and in real time you will see how to dismantle the seat, remove the old upholstery, and attach the new.

2. Installation kit that includes Hog-ring pliers and Hog-rings, spray glue, razor blades, foam pads, cotton padding, Lexol Leather conditioner, and a brochure on the care of your new leather seats.


(top of page)

4. Can I install MrMikes Leathers on Fiero Power Lumbar Option seats ?
  
Yes

1. Unscrew the control button trim plate on the right thigh support of the seat. Note that there is a small "F" and a small "B" on the underside indicating front and back respectively. It must be reinstalled correctly to avoid cracking.

2. Remove the old Hog Rings from the underside of the seat BEFORE unbolting the backrest.

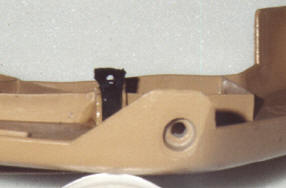
3. Locate the 4-hose connector under the metal frame. There is a rubber connector that you need to unplug. The plastic male connector is fragile, so use gentle persuasion to unplug the connector. If you break one of the pins you can bond it together again with some plastic epoxy.

4. Now unbolt the backrest and carefully pull the hose through the hole in the seat back as you separate the two halves of the seat.

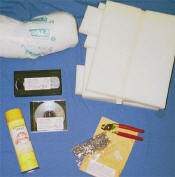
5. After you have removed the old seat covers you may want to blow into the 4-hose connector to see if your air bladders have any leaks. A tire patch kit works fine for plugging small holes. Use caution when putting the new MrMikes Leather on so as not to puncture the bladder or hoses when putting the new Hog Rings on.

6. After you have completely installed your new MrMikes Leather you can locate the original hole in the foam for the 4-hose connector and use a razor to make a small slice in the leather about 2 inches long.  Feed the hose connector through the hole and re-assemble the seat. Flip the seat over and carefully re-plug the 4-hole connector to the rubber connector.

7. Here’s the big trick for cutting the leather for the controls:
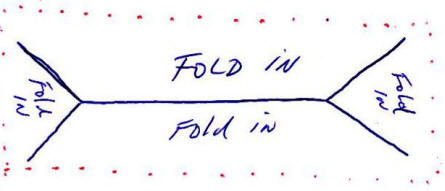
You will remove 2 Philips screws holding on the trim plate…
After removing the plate; PUT THE SCREWS BACK IN,,, right away,,, don’t wait.
Leave them protruding up just a bit, so you can feel them after the leather is on.
After the leather is on…
Caulk mark a straight line connecting the 2 screws.
THIS is where you cut the leather, (that is- the leather and it’s underlying foam).

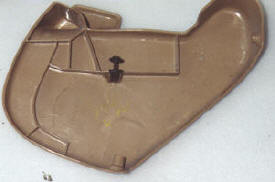
Here is a picture of the proper cut, it is not an ‘X’, it is elongated.
The 2 long sides will ‘stuff’ into the metal frame of the switch, and be ‘trapped’ by the trim plate, use a putty knife (or butter knife).
The 2 short ends should be ‘trapped’ under the 2 screws and the trim plate (poke the leather with an Awl after the trim plate is back on).

To get Nitty-Gritty:
After cutting the leather, push the underlying foam to the side, past the metal of the switch, so it does not get in the way of the trim plate.
And when installing the cotton padding to ‘boost’ the cushion bolsters, cut an opening around the Lumbar switch before installing the leathers.

8. Re-install the trim plate with the "F' facing forward. Don't over tighten the screws. Just snug them. You're done!
(top of page)

5. Access or Replace or Add Headrest Speakers?     (click here to see the information)
(top of page)
6. How do I fix that broken plastic side cover ?
Is your seat outer hinge trim loose?  Is the tab broken off?
Here is a fix that may help. (you will need to remove the seat from the car).

1. Remove any left over pieces of your trim tab and then find a small piece of sheet metal, cut it as shown in Figure B so it fits in the molded rectangle support used by the original tab Figure A.  Drill a small hole as shown in Figure B.

2. Use epoxy or urethane glue to hold the new tab piece in place. Attach the seat hinge cover trim with the two lower screws and then line up the new tab hole with the metal slot on the seat hinge (where the old tab was inserted).

3. Find a screw with a large head (or built in washer) and sandwich the metal slot between the new tab and the screw washer, Figure C shows which way to insert the screw.  This will hold the trim in place, and no one will know of your secret!
 

(Figure A)

(Figure B)

(Figure C)

Seat Trim Fix
(top of page)

Seat Trim Fix Tab

Seat Trim Fix with Screw
 

7. How do I remove a seat that is rusted in place ?
I often hear "my seats are rusted in place and they won't move".
  It is necessary to move the seat all the way forward and backward to remove the 4 nuts holding the seat to the floor.

A. Most Often the reason they won't move is because the connecting wire between the tracks has broken. The tracks have locks on both sides, when the lever under the front of the seat is moved sideways it releases the lock on one side, and a connecting wire releases the lock on the other track. If this (thin) wire has rusted and broken one of the locks is still engaged and the seat won't move.
    To Fix This: From the front, look under the seat to the track that does not have the lever. You will see a small locking device on the track that is held closed (locked) by a small spring. Disconnect the spring and push the locking pin sideways out of the track. Now when you release the side with the lever both tracks will slide. Replace the connecting wire before putting the seat back in the car.

B. The tracks may be rusted and stuck, shoot some WD-40 into the tracks, and sitting in the seat throw your weight backwards and forwards.  Once you get the seats to move, you can get to the 4 floor nuts in the front and the back.

C. The nuts holding the tracks to the floor may be rusted and hard to remove. These are nuts not bolts, they tread onto studs welded and pointing up from the floor of the car.  Try soaking the nuts with WD-40, Liquid Wrench or PB Blaster. If the nuts round off try using a vice grip to remove the nuts and replace them later. If they are still stuck in place try a nut splitter.  It is IMPORTANT that you do not cut these off with a saw; the threaded studs are welded to the floor, if you cut these off you will have to weld new studs to the floor, and that's bad.

(top of page)
8. The Headliner is falling down?
   The headliner has two parts, the "Board" and the "Lining". When the lining falls down what has happened is the foam back of the lining has disintegrated, the cloth is no longer attached to the Board. There is nothing you can do to reattach it (short of thumb tacks) you must replace the lining.
   New headliner material is cheap, about $3 a foot, and a Fiero only needs 3 feet. Look in your Yellow Pages under Automotive / Upholstery / Suppliers. You must use a HIGH HEAT contact cement spray glue, if the glue softens when it gets hot the lining will fall. The same places that sell headlining also sell the right spray glue.
   You must use a spray glue, and don't soak the foam or it will compress and after all your hard work it will look "cratered" with high and low spots.


IN GENERAL:
1. To remove the headliner Board from the car;
Remove the seats / remove the shoulder harness seat belt anchors in the pillars / remove the plastic trim from the windshield pillar and over the window / remove the wide plastic trim from the pillars / remove the sunvisors - light package - third brake light cover - sunroof latch cover - sunroof edge trim - etc. 

   *Solid Roof Cars- No Problems.
   *Sunroof Cars-
Sometimes when you take the Board out of a Sunroof Car it will break into pieces. They are so brittle I call them
                       "Potato Chips" to give you some idea of how easy they break. If you break a sun-roof board you have two options:
                        A. Put the pieces back together and contact cement thin pieces of cardboard on the back to reinforce the board.
                            Cereal boxes work well (like Cheerios).  Leaving the cloth ON will help.
                        B. Buy a replacement aftermarket board, The Fiero Store  www.fierostore.com  sells them.
                             (personally, I prefer the fix-it-yourself route)

2. With the Board out of the car pull off the old material, and clean the Board well to remove all the old foam residue. Use a stiff brush to sweep all of the old foam off of the Board. If the foam is not all disintegrated use very rough sandpaper. Do not damage the smooth surface of the Board.

3. Lay the now clean Board face up, lay the new foam backed Headliner Material on the Board. Center the material so you have at least 2 inches hanging over all four edges. Place a small weight on the material just off center (center being forward & aft in the car, windshield to back window). Flip the material half way back so you can see half of the Board. Spray glue the exposed half of the Board and the exposed half of the material.
   DO NOT spray glue into the center folded area at this time, it will leave a crease if you do.  Let it dry (set-up) a few minutes, remember... this is contact cement. Lay the material back on the Board, and gently press the material down into the low areas first, use the palm of your hands not your fingers, fingers leave depressions. PRESS GENTLY!  You still have the other half to do. DO NOT press in the center area at all, it will leave a crease if you do.
   For the second half; Flip the other side over and spray glue the Board and material.  You can spray glue into the folded center at this time. Let it dry (set-up) a few minutes.
Flip the material onto the Board, give a soft tug to the material to avoid a crease in the center, gently press the material into the low areas using the palm of your hand.
   NOW you can press down firmly (but still using the palm of your hand) on the entire headliner.
Turn the Board over, spray glue and wrap all 4 edges.


NON SUNROOF CARS:
 
  Put the Board back in the car. No Problems. Cut holes for the visors - lights - etc. when the Board is in the car, just in case.

SUNROOF CARS:
 
  Cut a SMALL rectangle in the center of the sunroof opening, stay at least 4 inches away from the opening edge of the Board.
    After the Board is back in the car, and all the visors - lights - latches - etc. are installed, paint glue into the roof's silver metal
    track and onto the headliner material. Starting in the corners pull the material "in & up & out" and use a putty knife to stuff the
    material into the silver track. Trim off the excess, and replace the rubber trim.

(top of page)

9. The sun visor falls down.

  
The sun visor rotates on the hinge pin; if this pin spins in the socket then no matter how much
you tighten the tension screw the sun visor will not stay up.

1. Remove the tension screw from the visor, slide the visor off of the pin.
2. Check to see if the pin is spinning in the socket of the sun visor hinge.
3. If the pin spins; (A) Put the hinge in a vice and smack the pin down with a hammer to re-seat it.
             *DO NOT try this in the car, you will slip and bust the windshield.
                or (B) Tack weld the pin to the hinge.

picture of inside the visor

(top of page)

10. The console edges are curling up?

   Yes it can be fixed, if the plastic is sound.

  
 Firstly, this technique REQUIRES that you use an
      air or electric stapler, it won't work with a hand held
       staple gun.

    1. Take the part out of the car.

    2. Warm the vinyl with a hair dryer if it is cold.
        You will need a firm surface to work on, a counter
         top or such, not on a carpeted floor.

   3. Push the vinyl back into position, use 1/4 inch long
       staples in an air or electric stapler to mechanically
         fasten the vinyl back where it belongs.
                                                                                       
    I have heard of many different types of glues that work,
    but I've never seen anything better at holding the vinyl
    in position than staples.

    The same technique can be used on other parts too.
    Here is a picture showing the repair of a glove box door.

    It is important  that you have the part firmly supported
   on a counter top, a block of wood, or other firm surface.
   If not, when you pull the trigger, you will BREAK
   the brittle black sub-structure plastic.


(top of page)
11. Can I change the color of the interior?
   Yes, But...

   
Changing the color of a car interior is a big deal.
    There will be many many parts that you never noticed before that are all the wrong color (a good example is the seatbelts).

   Fabric Dyes: In my opinion,,, don't. Fabric dyes in spray cans are bad. It is really just paint.
                        You will ruin your cloth seats or carpets if you use it. It does not work on seat belts.

   Vinyl Dyes:   S.E.M. is a good example, works well on SOFT (squishy) plastics.
                    
   Spray Paints:
     For Black:
         Krylon makes a spray can called "Fusion", Rust-Oleum makes a spray can called "2X".
          Both say "bonds to plastic".
           Both work very well on HARD plastic parts (like door jambs).
            I prefer the gloss level of "Satin", the interiors of cars should not be too shiny.

    For Custom Colors:
        Go to your local AUTO paint store, bring a color sample of the color you want.
          They can custom mix the appropriate type of plastic paint to match your sample.
           Talk to them about the 'hard' and 'soft' plastics you want to paint, each will require a separate formula.
            They can put it into spray cans for you, or in a quart can - for use in a touch-up spray gun.

   Seat Belts: The seat belt material is called "Webbing". Contact a local Airplane Upholstery Shop (often near an airport).
          They change the seat belts in airplanes all the time, talk to them before removing the retractors from the car.
           Seat belt Webbing itself is not expensive, expect to pay about $100 for the experience of the upholsterer
             to changed the Webbing correctly.


     All in All... The colors in a car interior can be changed, with care. Use the proper paints for the plastic being painted.
                       And just like the exterior paint job, 90% of the job is in the preparation; dismantle and clean the parts well.

(top of page)
12. Can I put Fiero seats in a different car?
    Yes
   H
ere is a set of MrMikes Leathers on Fiero seats installed in a MG.
  
 Click here to see Fiero / MG mounting instructions

 
  Fiero seats also work well in MGs, Panteras, Bricklins, Deloreans, Corvettes, Camaros, Firebirds, Street-Rods, Dune Buggys, Jeeps, VW Bugs, and many more.

  The Fiero seat was especially designed for the Fiero by the Lear Corporation (not GM). It is unusually low and narrow, with unusually good side support.
   An added bonus is that the bolt pattern on the bottom of the seat is 'typical' 1980s GM, meaning it will bolt on top of many GM power seat track packages, making it an excellent choice for use in street rods & trucks.

 
 13. Can I put different seats in a Fiero?
      Well yes, it's a free country ;)
      But I don't recommend it, the Fiero seat was specifically designed for the Fiero (see above) and every other seat I've seen
       used sits up too high and too far forward in the car.
    
(top of page)

 14. Can the steering wheel leather be changed?
    
YES

 Re-Leathering a steering wheel is an expensive & serious proposition (MrMikes does not do them).

 1. There is a place in Michigan that does Fiero GT steering wheels, Pelton’s Corvettes 1-248-681-4336.
     Call them before proceeding. Matching MrMikes leather can be sent to you, then sent along with the
     steering wheel to Pelton's. This MrMikes seat matching leather is $35. The Fiero GT leather steering wheel
     has two separate pieces, the smaller piece at the top can be a different (2-tone) color.

 2. You can buy an aftermarket leather wrapped steering wheel from an auto parts store and adapt it to the original
     hub. Doing this adaptation will keep the new wheel in the same position as the original (I hate those goofy adapter
     kits that push the wheel 4 inches towards you). The hub is a round hockey puck shaped steel part that fits on to the
     steering column. The steering wheel rim and spokes bolts (machine screws) to this hub.
     A. Remove the horn button / remove the retainer clip / remove the large nut holding on the hub / remove the wheel.
     B. Drill out the rivets holding the horn button ring & rear plastic collar, remove the screws holding the wheel to the hub.
     C. Screw the new wheel to the hub, (you may need to drill holes in the new wheel to match with the hub). Use Lock-Tite.
     D. Rivet on the rear collar and horn button ring, replace the large nut and retainer clip.
   Be sure to buy a new steering wheel that has a similar diameter and NO "dish" (the distance between the hub and the rim
   when placed flat on a table). The original Fiero steering wheel is flat and has no "dish".

(top of page)

 15. How do I put in new carpet?   Click Here for details
(top of page)

 16. The seat foam is deteriorating.  Click Here for details
(top of page)

 17. Can I install Seat Heaters?

  
YES: Seat Heater Pads are OK, no worries installing them under MrMikes upholstery.

(A) In the instructions you will see that I tell you to glue the new foam pads (marked 1-2-3) to the cushions and re-use & glue the foam pads to the backrest.
Place the seat heater pads ON TOP OF these foam pads, just under the new upholstery.

(B) Most seat heater pads are self-adhesive, just peel off the wax paper and stick them on.
Run the wires through a small ‘Poke” in the upholstery / in-board closest to the console / by the pivot pin.

(C) To get “The Look” I tell you to hog-ring the new upholstery to the core of the seat under the logo of the backrest / and in the middle of the cushions. This is called “Listing”.
This is a modification to the original Fiero seat upholstery.
You will want to buy seat heater pads that will fit between where these hog-ringed “Listings” are.
Measure the flat spots where the seat heater pads are to go…
And buy the ones that will fit without bridging these “Listing” areas.
You CAN NOT poke through the seat heater pads, they won’t work.
 
(top of page)

Got a question?
Email MrMike

Back

(c)  mrmikes.com