|
Bolting Fiero Seats into Another Car |
| * Be advised that the information provided here and on MrMikes.com in general does not warrant or assume any legal liability or responsibility for the accuracy, completeness, or usefulness of any information, apparatus, product, or process disclosed. The views and opinions of authors expressed on MrMikes.com do not necessarily state or reflect those of the U.S. Government Department of Transportation, the automotive manufacturer, or any requirements and/or standards of any country. See an authorized service department for information concerning warranties and liabilities and their relation to modifications performed by persons not authorized by the manufacturing corporation. MrMikes.com is not affiliated with any manufacturing corporation. Use of this information signifies your agreement to the terms of use. |
| MrMikes general
information on bolting Fiero seats into another kind of car: 1. The seat tracks act as an intermediary between the floor of the car and the bottom of the seat. 2. It is very important that the bottom of the track is securely bolted to the floor of the car and the top of the track is securely bolted to the bottom of the seat. (Please do not use screws and pieces of wood) Depending on the shape of your car's floor and the design of your car's seats tracks you may want to: (A) Alter the top of your car's original seat tracks to fit the bottom of the Fiero seat. (B) Alter the bottom of the Fiero tracks to fit the floor of your car. A. Often the floor of your car is not flat and the original tracks have been made to provide a flat plane for the seat to sit on, in which case it is better to use your car’s original tracks. Your tracks will have the proper holes to bolt the tracks to the floor of your car; the floor of the car is reinforced where the tracks bolt on. The Fiero seat is a sheet metal design. The bolt holes on the bottom of the Fiero seat for the tracks are backed with copper ‘doughnuts’ to accept the track bolts. As a rule it is easier to alter the top of your tracks than the bottom of the Fiero seat. B. If your car’s floor is flat (like the Fiero) you can use the Fiero tracks. The Fiero tracks have rear flanged ‘feet’ that can be modified to align with your car's floor mounts. The front feet of the Fiero tracks have a simple centered hole. 3. The bolt pattern dimension on the bottom of the Fiero seat is: 14 inches front-to-rear and 13 3/8 inches side-to-side 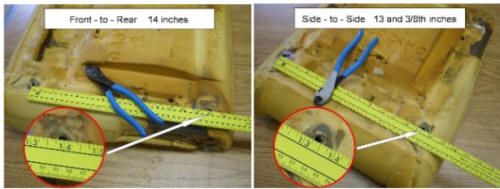 (Click
to see larger)
(Click
to see larger)4. Remove your original (non-Fiero) seats & tracks from the car by un-bolting the tracks from the floor of the car,,, remove your tracks from the bottom of your seats,,, measure the mounting points (bolt holes) on the bottom of your seat. ‘track-to-bottom of seat' . As a rule General Motors cars often use the same track mounting point dimensions, if so you are in luck. If the side-to-side dimension is correct you may be able to drill front-to-rear hole(s) in the top of the tracks to accept the Fiero seat. If not you will probably need to weld metal plates (maybe two, maybe four) to the top of the tracks and drill holes to accept the Fiero seat. 5. Lastly: The frame of a car seat typically sits higher in the front (under your knees) and lower in the rear, this angle is called ‘Rake’. Be aware of this when modifying the tracks as you will find a flat & level car seat uncomfortable to sit in, and will cause you to ‘submarine’ under the lap seatbelt in the event of a crash. Rake can be added by using spacers and longer 'track-to-bottom-of-seat' bolts. |